26 August 2013

Week 5 - Setting EQ presets (Audacity)

We've gotten to week 5 of  Introduction to Music Production  at the Berklee College of Music, offered via Coursera. We have really been getting under the hood, so to speak, of our DAW. 

This week, for my homework assignment, I have chosen the suggested topic:


"Demonstrate the configuring of an EQ plugin to function like a large format mixing console EQ section. You can use the settings shown in the material or base your settings off of the manual of another mixing board. Include instructions showing how to save the setting as a preset in your DAW"

Lesson:
The analog mixer shown in the course material had five preset EQ filters:

  • HP (high pass) flat 75 Hz 18 or 24 dB/OCT
    Sounds below 75 Hz tend to be environmental noise, mic fumblings, and mouth noises; by rolling it off at a rate of 18 dB per octave, these unwanted noises are reduced, if not eliminated. 
  • Low Shelf 80 Hz   +/- 15dB  (9.8 Q)
    This filter reduces the volume of very low-pitch sounds, but only by a set amount. This creates a lower-volume "shelf", instead of continuing to reduce the volume per octave. Combining these two low-end filters creates a softer, more natural sounding fall-off. 
  • Low Mid Bell 400 Hz (340) Range 100 to 2K +/- 15  (1 Q)
    The fundamental frequency of most instruments fall in this range. Too much fundamental can make the sound heavy and "boxy", while too little relative to the overtones can make the sound thin and ungrounded. For vocals, you might want to lower this area a tiny bit.
  • High Mid Bell 2K (2014 Hz) range 400 to 8K) +/- 15  (1 Q)
    This is the band that holds the overtones, that really define the timbre of a sound. A very slight boost here can often add brightness and "air". 
  • High Shelf   12000 Hz  +/- 15  (1Q)
    Sounds over 12000 Hz tend to consist of hiss and other unwanted sounds, so the volume in that range can be lowered. By using a shelf instead of a low pass filter, the volume is never rolled off to nothing. 

In each case, the filter is defined by 
  • a frequency (in Hz) defining the center of the bell curve (or the threshold of a shelf or pass filter)
  • an amount by which the volume is changed (+/- 15 dB in the model mixer, though you rarely want to change the gain by more than 6 dB)
  • the width of the bell curve (a number called Q)

Q: So how do we make these filters in a DAW?
A: We use a plug-in.  

There are hundreds of plug-ins available that work with most DAW programs. In class, Dr. Stearns used iZotrope Alloy. Alloy's interface mimics the look and feel of an analog mixing board. That plugin costs $199, and although I downloaded the trial version, I wanted to see what I could do with the open-source plugins available for the open-source DAW, Audacity. 

The basic Audacity Equalization plugin is found under the effects menu:


When you open it, you get a graph. You can manipulate the graph by directly dragging parts of it up or down. You can also click on the "Graphic EQ" button to show graphic equalizer sliders. 

Note that by default, the equalizer comes up with a low-end rolloff. I used the Graphic EQ setting, and tried to emulate the settings outlined above. 

The High Pass and the Low Shelf filters interacted to make a sort of wiggly roll off profile. The small bumps around 400 Hz and 2000 Hz represent the Low Mid Bell and the High Mid Bell filters. The High Shelf reduces the upper frequencies to a limited extent. 

To save this as a preset, one simply clicks on Save/Manage Curves:


This is now available under the "Select Curve" presets:


The default graphic equalizer is nowhere near as elegant as iZotope Alloy, but it serves the purpose. 
However, there are some slightly slicker, but still free, plugins that deserve investigation.
This one, Camel Phat, for instance, looks like it can do all that and quite a bit more:


Investigating all of the thousands of available plugins seems to be an impossible task! But it seems that if you know the parameters of what you want to do, you can do it in a number of ways. 

=======================

Reflection:
This was a difficult assignment, in that nothing quite seemed to resemble what Louden had demonstrated in the videos. I tried several different approaches; the multiplicity of plugins was overwhelming. I found that I could create individual filters and apply them sequentially, but I wanted one plugin that would do it all. The graphic equalizer would do it, but I am not quite happy with the interaction of the HighPass and the Low Shelf filters. I  have not fully explored the Camel Phat plugins, but certainly plan to. I have used Audacity for awhile, and never knew it could do so much more than what I was using it for. 

Thank you for reading this. 
Please, if you find an inaccuracy, leave a comment. I want these blog posts to be more than just a homework assignment; I want them to be useful. Again, thank you. 

19 August 2013

Dynamic Range -- IMP Week 4

Hi folks -
Welcome to my latest assignment from week 4 of "Introduction to Music Production", an online course from Berklee College of Music via Coursera. We are really getting into the nitty-gritty!

My chosen topic this time is:

Explain Dynamic Range and the many ways producers manipulate dynamic range.

=== Lesson ===

Dynamic range, in acoustics, is the ratio between the volume -- the sound pressure level -- at which no sound can be heard, and the volume at which ear damage or pain occurs.
[Dynamic range can also refer to the theoretical limitations of a piece of equipment, but the equipment here is the human ear, so hearing threshold and pain threshold are appropriate parameters.]

To start talking about loudness of a sound, we have to start with the sound itself. 

Technical stuff
Sound in air consists of a sequence of compressions and matching rarifications. A sound with one thousand of these sequences per second has a frequency of 1000 CPS (cycles per second), also called 1000 Hz (hertz, named for physicist Heinrich Hertz). The frequency of the sound is what we hear as pitch, and contributes to timbre. The volume of the sound, however, is determined by the average* sound pressure level (SPL) of the wave compressions.  That is what we perceive as loudness. 

Note that loudness is how we perceive sound pressure. They are not quite the same thing. For one thing, the ear is more sensitive in some frequencies than in others. We hear best in the 1000-4000 Hz range, which is where the vocal overtones that let us distinguish speech sounds fall. Strong overtones, such as those generated by distortion, do not necessarily add physical volume (same SPL), but they increase the perceived volume, or loudness. 

In physics, we measure pressure in Pascals. The lowest sound pressure level (SPL) the human ear can hear is about 20 microPascals (μPa). In acoustics, we call this zero decibels, and use that as the baseline to define the human hearing dynamic range. 

The upper end of the human hearing dynamic range is the sound pressure which is actually painful, and can cause permanant damage to the ear with only a short exposure.  This is usually considered somewhere around 120-140 decibels. 

Decibels are logarithmic. A dynamic range of 0 to 100 dB would be from 20 to 100,000 microPascals. 

So how does the concept of dynamic range apply to sound recording? 

First, in any situation, there will be a certain amount of ambient noise. In even the quietest concert hall, there will be the sound of people breathing, moving, shifting their weight; in a cafe setting, there will be (hopefully quiet) conversations and noises from the food and drink. In a studio, there will be electronics noises. The "noise floor" essentially raises the bottom end of the dynamic range. A "noise ceiling" is also provided by the point at which the signal approaches distortion levels, or even just uncomfortable levels. 

Basically, to change the dynamic range, we can amplify or lower the loud parts, thus changing the "ceiling" of the dynamic range, or we can amplify or lower the soft parts, thus changing the "floor" of the dynamic range. 

Sometimes you need to change the level of a track, for instance when a vocalist varies the mic/mouth distance, or when the audience joins in on a chorus. But when would we want to change the overall dynamic range?

One example for which a reduced dynamic range might be desirable is narrating audiobooks. While a certain amount of dynamic variation adds interest to the storytelling, the volume must not vary so much as to make the words in a quiet passage hard to understand, or a shouted part unpleasant. 

"Mood music" is another genre which calls for a reduced dynamic range, as it is often geared towards a hypnotic smoothness. 

On the other hand, a movie may have a soundtrack designed to have a huge dynamic range; a film may have a whispered conversation in one part, a subliminal tone in another, and then try to shock you out of your seat with huge explosions. 

There is an unfortunate trend towards reduced dynamic range in the guise of increased loudness. If everything is loud, then the dynamic range is restricted to a boring monotone, just a monotone with unpleasant clipping. Here are some very good articles:

In Celebration of Dynamic Range by Matthew MacGlynn


*Footnote: To measure loudness, we want an average of the sound pressures of the cycles. However, the way math works, since compressions (positive number) are paired with rarifications (negative number), the pairs average to zero. To get around this, we have to first square the figures. This makes all the values positive numbers. Then we average the values, and take the square root. This gives us what is called the "root mean square" or RMS value.

=== Reflection ===

I hope I didn't get too technical on the "explain dynamic range" part. I found it fascinating, and had gone off on a tangent on exactly what a decibel is, before I decided that was really not appropriate and deleted it. But I do have definite geeky tendencies. 

Those articles on dynamic range were especially interesting. The first is a lament; the second is really more informative. But they both talk about a problem that I hadn't really been aware existed. 
Again, I wish I had more time to devote to this assignment. I need to spend a LOT more time playing with my DAW. 
Thank you for wading through this. 

11 August 2013

Categories of Effects (week 3)

== Introduction ==
It's now the end of the third week of "Introduction to Music Production", an online course from Berklee  College of Music via Coursera. We have been learning the editing functions of our DAW.

For this, our third assignment, I chose the suggested topic:

Categories of effects: Teach the effect categories including which plugins go in each category and which property of sound each category relates to.

== Lesson ==
Sound
First, a review of some properties of sound. There are three properties that we often wish to manipulate:
1. Amplitude refers to what we perceive as loudness of a sound. We often want to raise or lower the loudness of one track relative to the others. More technically, though, we want to amplify the signal to a certain level, but not have it exceed another level. We are affecting the dynamics of the sound.

2. Frequency refers to what we perceive as pitch, but it is really far more complex than that. A tone has a series of harmonics, and it is the relative strengths of those harmonics that give a sound its perceived timbre. We can apply filters that affect certain frequencies, that then change the timbre of a sound.

3. Propagation refers to the movement of sound through a medium; through the air, and how it is reflected from surfaces. The time difference of the signal as it enters our two ears allow us to tell which direction a sound is coming from. We also use a sort of unconscious echolocation, so that the time delay properties of the sound tell us how large a room we are in.

In a DAW, these properties are manipulated using plug-in, and are called "effects". An effect can be applied to one track, or tracks can be sent to a common bus, and the effect applied to the bus.

Categories of Effects

Dynamic Effects, also called "Volume Changing" effects. 
These are related to amplitude; they automatically control volume based on the material over 
time. 
Examples are compressors, limiters, expanders and gates. 
Generally, this type of effect determines the overall or perceived volume of the track. They make the tracks sound more even, not too loud or too soft. 
A Limiter can raise the overall volume of a track (by setting the Limiter threshold low), but the volume never goes over the specified limit, so the track is never so loud that it "clips". If you set the Limit and Threshold too low, you can squish the dynamics. That's one way to make elevator music.   

Filter Effects, also called "Sound Shaping" effects
These control the timbre of the sound. If you recall, timbre is the result of the presence of certain overtones or harmonics of the sound. If you change that pattern of overtones, you change the timbre. 
Filters change those overtone patterns. EQ filters, such as parametric filters or graphic equalizers, are examples, as are any high- or low-pass filters.  


The range of about 4000-6000 Hz is called the "Presence" range. You can bring a voice or instrument forward or pull it back by a slight gain or drop of these frequencies.

Delay Effects, also called "Time-Based" effects. 
They add slight delays to the signal, and are thus related to the propagation principle of sound.
Examples are reverbs, delays, choruses, phasers, and flangers. 
The cool thing about these effects is that you can create an audio illusion. You see, if someone is playing in a small room, the sound signals come to both of the listener's ears directly and nearly simultaneously. In a large room, the sound echoes a bit. If you apply a bit of delay to a track, it will sound as if the sound is being played in a large room. This illusion is so great that most DAWs have preset effects for "large room", "small room", etc. 
A touch of delay can also just make a track sound fuller and richer. 

In Reaper, there are over 200 plug-ins that come with the program. Of note are:
ReaComp - a compressor; a type of dynamic effect.
ReaDelay - a delay effect used to make sounds fuller or thinner
ReaEQ - a filter effect that adjusts the frequency spectrum to change timbre
ReaGate - a filter effect that filters out sound when the volume falls below a specified threshold. 
ReaPitch - a filter that can raise or lower the pitch of a sound, or of certain harmonic peaks. 
ReaVerb - a delay effect that focuses more on actual reverb and echoes

VST stands for Virtual Studio Technology; VST plugin effects are used by a number of DAWs. There are also VST instrument plugins, and VST MIDI effects. 

Each effect has a number of parameters that can be set, but most also have presets that can be used. 

=== Reflection ===

I found it very helpful to place effects in categories. However, some effects cross the boundaries. For instance, the ReaGate effect really falls into two categories -- it uses a filter to determine whether to apply a dynamic effect.  So all is not black and white. 

This topic didn't really call for screen shots. I hope this text-version is okay, and is understandable. 
Thank you for taking the time to read it. 

05 August 2013

Recording Audio using Audacity

Hello again, dear readers!
This is Claire - but you knew that, since this is my blog.

Once again, I present an assignment for the online Coursera/Berklee course "Introduction to Music Production". This is week 2 (lesson 2), and we were again given a list of possible assignments.
I have chosen to do the second one:


Record audio in your DAW including preparing the project, creating the track(s), setting the click and countoff, and recording efficiently.

Lesson: 

My audio chain is as follows:


1. AKG Perception 220 microphone
      connected by an XLR cable to


2. Onyx Blackjack USB recording interface
      connected by a USB cord to a Mac running


3. Audacity DAW
Audacity is open-source and free, and available for Mac. Linux, and Windows.


Recording the audio starts with preparing the project. So, to my mind, this assignment includes the first topic, namely  Prepare a project in your DAW using the project checklist from the material as your guidelines. In any case, even though I am going beyond simply preparing the project, I find checklists very useful, and recommend their use to anyone.

My project list, based on what was presented in the lectures, is as follows:


The first thing is to determine the
 1. Project name and location.
I created a folder called "IMP-sandbox" on my desktop. A"sandbox", in programming, is a place to experiment,. Since this project is purely experimental, the name seemed appropriate to me.
For your project, use whatever name seems best to you.

Next, set the
2. Digital Audio Preferences -- use a sample rate of 48,000 Hz and a bit depth of 24.  This is higher quality than the CD-standard of 44,100 Hz and 16-bit. However, a little extra quality doesn't hurt, and if you deal with soundtracks, 48 kHz syncs more easily with standard video than does 44.1 kHz.

In Audacity, this is set in Preferences:
3. Recording file type 
This should be set to uncompressed; broadcast WAV, AIFF, or WAV.
As it happens, Audacity saves files when recording using its own .au file format. Only when you choose to export a recording are you offered a choice of file formats. Therefore, this is not a setting to be set now; this is something we must keep in mind when it comes time to finalize the recording.

4. Hardware settings
This is necessary to do because th system audio setting for input and output do not necessarily affect the DAW settings.
In Audacity, it is simple enough to choose the appropriate input and output (the Onyx BlackJack interface) from the pulldown menu.  However, the pulldown will not show your interface unless you plugged in the interface before you started Audacity.
Once the interface is plugged in, it will show up in the pulldown menu.  I found that it was not necessary to have the microphone attached to the BlackJack. Of course, when you DO attach the microphone, make sure all the levels are down and the phantom power is off, so you do not generate damaging clicks.
5. Buffer size
When recording using a DAW, there is a certain delay - perhaps only milliseconds - between the production of a sound and when you hear it in the monitor. This is called latency. When recording, you want the latency to be as small as possible; you don't want to notice it at all. So you want a small buffer, perhaps storing only 128 samples. But that means the computer has to work very hard to continuously process the buffer. It's like trying to bail out a leaky boat with a teacup -- you have to work much harder to keep up with the leak than if you could use a large bucket.
Later, when editing, the computer will have to do many more things, as it juggles multiple tracks, plugins, and effects. At that time, you may need to increase the buffer size, perhaps to 1024 samples.
There will be more latency, but that will not be terribly important at that point.

Audacity seems a bit peculiar when specifying buffer size. It does not give the option of # samples. Instead, it has a place to enter milliseconds:
The default is 100, and I left it at that. Since there are 1000 milliseconds in a second, 100 milliseconds is one-tenth of a second, and it seemed to me that was a small enough delay.

Now we are up to the recording part of the checklist!
The first item here -- 1. check your settings -- refers to what we have just done, so we don't need to go through that again. But it is a good idea to double-check everything.

2. Create a track - choose mono or stereo
To create a track in Audacity, you use the menus: Tracks > Add New > Audio Track. Or, you can use the keyboard shortcut of shift-command-N.
Once you have created the track, you can set it to mono, or left or right of a stereo track. Use the "Audio Trac" pulldown menu. Note you can also set bit depth (they call it sample format) and rate on this menu, if you were to want to set specifications for the track that were different from the project defaults.
3. Name the track
You use the same "Audio Trac" pulldown to name the track. In the picture above, you can see the first item in the menu allows you to name the track.

4. Record-enable the track
The track comes pre-enabled in Audacity -- in fact, I could not find a place to disable the record enable.

5. Set your levels using the microphone pre-amp
On the BlackJack interface, I made sure the levels were down and the phantom power off before connecting the microphone. With the microphone connected, I turned on the phantom power (because I have a condenser mic) and brought the gain up. In Audacity, you have to click on the meter space above the microphone picture to turn on the meter for non-recording level setting.

The BlackJack has a marking for Unity, so I first made a test recording with the level set there. It was far too low. Audacity is a bit confusing here, because the level meter uses a pink and red indicator. Red in this case does NOT mean you are in the distortion/clipping range.
The BlackJack, however, has a signal light that displays the expected behavior: green to indicate a sound signal; yellow to indicate a peak. (And presumably, red for clipping, but I did not go there.)
During file playback, the Audacity level meters show the expected green/yellow colors (the playback meter is to the left of the record meter). I do not know why the designers did this.

To set the levels, it was necessary to watch both the single LED on the BlackJack and the level meter in Audacity.

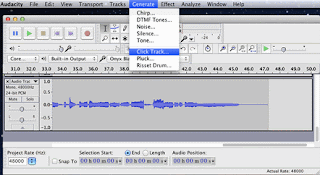
6. Enable the click track and count off
In Audacity, you turn on the click track by going to Generate > Click Track :

7. Record (efficiently!)
Time to click on the red dot to start recording, record, then click on the button marked with a square to stop recording.
My result:
This screenshot was taken during playback, and notice that the playback levels are green.

The recording's done!! Now a few more tracks ... editing ... comping ... normalizing .... hmmm. I guess it's not quite time to celebrate - there's still a lot of work to do!

Thank you for taking the time to read this. I hope it has been of some use, and I welcome any comments.

Reflection

Audacity is a free, open-source DAW. Although I have used others, that's the one I've mostly used. However, I found when trying to find the various editing functions, that Audacity is peculiar in many respects. This lesson shows two things that seem odd; one, that buffer is in milliseconds rather than in samples, and two, that the record level meter is in red.

As I investigated the editing functions, there were enough things that were odd that I decided to download Reaper, a program that many people on the message boards seem to like. However, I did not have time to learn a whole new system. So I selected a topic that really review's last week's work, rather than one that uses more of the editing skills we have been learning this week. I am still trying to find my way around Reaper.